

When I started this blog my intent was to share my original knitting patterns. I didn't plan to write much about myself, and I certainly didn't plan to post tutorials for fabric collages! But I did fall head over heels for painting and collaging, so I'm offering this tutorial to others out there dabbling like I am.
These simple mini collages are a great way to preserve bits of your favorite fabric and use up scraps. Because they are small and fast to make, you can feel free to experiment with colors, shapes, and styles. I sometimes make two or three at the same time, and won't hesitate to paint over a collage that doesn't turn out as expected.
Supplies:
-A tiny canvas. I like the 2" x 2" size found in craft and hobby stores. I have also seen these in Diddams, the party supply store, in the craft section.
-Acrylic paints. I buy the cheap-o paints at Michael's for about .75 cents each.
-Paint brushes in a variety of sizes.
-Paint brushes in a variety of sizes.
-Fabric with interesting colors/motifs.
-Acrylic Gel Medium for use as a sealant and adhesive. This is fairly inexpensive and can be found at any craft store.
-Modge Podge to seal your finished collage with a bit of a sheen. Again, widely available in craft stores.
-Scissors for cutting fabric.
-Glue for adhering fabric layers to each other.
-Scissors for cutting fabric.
-Glue for adhering fabric layers to each other.
To make the miniature fabric collage:
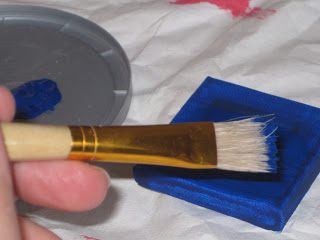
1. Paint the canvas the background color(s) of your choice.
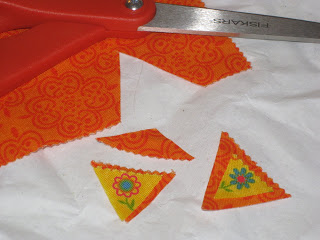
2. While waiting for the canvas to dry, cut the fabric in to small, interesting shapes. Use a drop of glue to adhere fabric layers to each other.
3. When the canvas is dry, apply a light coat of gel medium to it and then arrange the fabric pieces on the canvas while the gel is still wet.
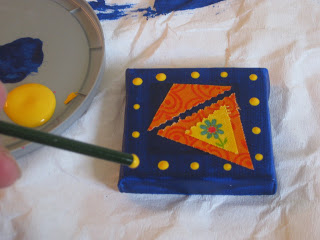
4. Allow the gel to dry, and then add a frame of paint dots. I learned this technique from the marvelous book Mixed Mania -- using a dried up ball point pen (or the non-bristle end of your paintbrush), create dots around the edge of the canvas in one color, and then go back and use a second color.
4. Allow the gel to dry, and then add a frame of paint dots. I learned this technique from the marvelous book Mixed Mania -- using a dried up ball point pen (or the non-bristle end of your paintbrush), create dots around the edge of the canvas in one color, and then go back and use a second color.
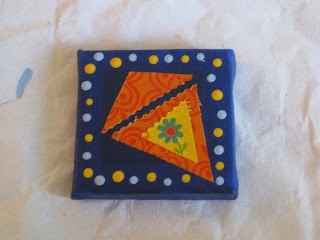
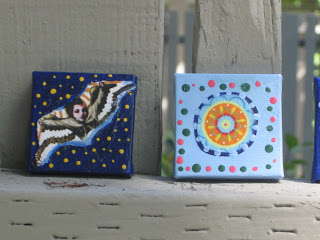
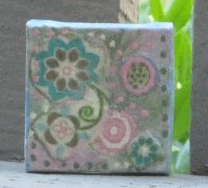
Or, decorate in any way you like. You could paint swirls or circles, write words, use stamps, outline the fabric pieces with a pen, add bits of paper or metal. Here are some examples:
5) When the collage is dry, seal it with a light coat of Modge Podge.
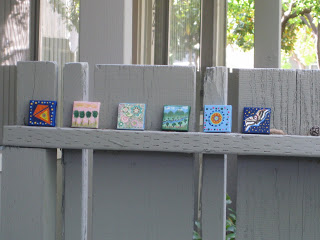
You can hang these individually or as a series, adhere them to a larger canvas or to a piece of wood. I have a gallery lined up on my patio fence.
Here are some additional resources for collaging:
Taking Flight: Inspiration & Techniques to Give Your Creative Spirit Wings by Kellie Rae Roberts
Mixed Mania: Recipes for Delicious Mixed Media Creations by Debbi Crane and Cheryl Prater
The website of artist
DJ Pettitt
also has some wonderful fabric artwork that will inspire you.
6 comments:
So cute to have your tiny collages lined up on your fence. They all look so proud of themselves. Dogwood
Thanks Dogwood! I'm waiting for a squirrel to take off with one ...
Hi Stacy, I hope you have a nice relaxing weekend also, thank you for commenting on my blog.
Take Care
Love Melanie xxxx
This is a really cute nifty idea! :-) Hope you're enjoying your weekend Stacy. Cheerio, woollywotnots.
Thanks for your comments Melanie and Katharine! I'm kind of addicted to making these little collages-- they are so fast and easy, and I'm all about the gratification that comes with finishing a project :-)
It has been a good support, thank you so much, now to make a miniature fabric collage is quick with your suggestions. Thank you
Post a Comment